

How many leads does your local business’s Facebook Page generate every day?
Seriously, when was the last time you even checked?
Chances are it’s not a key performance indicator (KPI) you scrutinize regularly—if you track it at all. You know you like those Likes.
But did you know that social media users spend nearly 17% of their online time using Facebook’s suite of owned apps according to the latest Nielsen data?
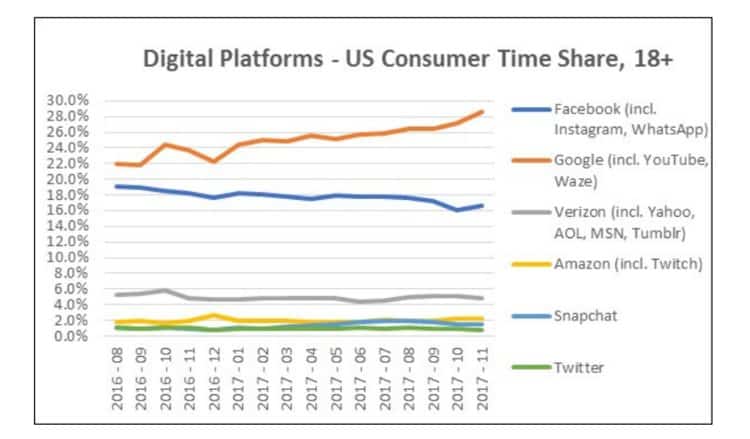
(Pivotal Research analysis of Nielsen data)
With more than 1.40 billon daily active users on Facebook at the end of 2017, that represents massive opportunity for brands to get eyeballs on their offers. So then why does HubSpot’s 2017 State of Inbound report indicate marketers find generating traffic and leads to be their greatest challenge?
Well, open a handful of Facebook Business Pages created by some of your favorite brands and evaluate their business info, visuals, and content. You’ll soon discover that the majority of them aren’t truly optimized for lead generation.
While you might find a sign up link here or there, there are a number of Facebook lead generation hacks marketers simply aren’t leveraging. Considering that organic reach has taken such a major hit over the last few months, wouldn’t it then make sense to optimize your Facebook Page so that you can capture the email addresses of people who do stumble upon your Page and content?
Yes it does.
So, armed with the brand new lead magnet I taught you how to create in my previous post, I’ll show you ten opportunities you might be missing for driving traffic to your lead generating landing page from Facebook.
It might sound obviously simple to some Page admins, but many business owners still don’t think strategically about their Page’s call-to-action button. Designed to put your most important objective at the forefront of your Facebook presence, the CTA button can be an incredibly powerful tool for increasing conversions. In fact, the Dollar Shave Club saw tremendous results in just a short period of time.
“Over the course of a three-week test, the Sign Up call-to-action button delivered a 2.5x higher conversion rate versus other comparable social placements aimed to drive new user acquisition.”
— Brian Kim, Director of Acquisition, Dollar Shave Club
Since it’s one of the first features visitors see when landing on your Facebook Page, the CTA button could deliver huge rewards if you let it. If you haven’t already updated yours with lead generation in mind, follow these steps:
Step 1: Navigate your way to your local business’s Facebook Page and click ‘Add a Button’ or the CTA button you currently have.

Step 2: Click ‘Contact you,’ select ‘Sign Up’ from the menu, and then hit ‘Next.’ You can preview what your button will look like just below the cover image.
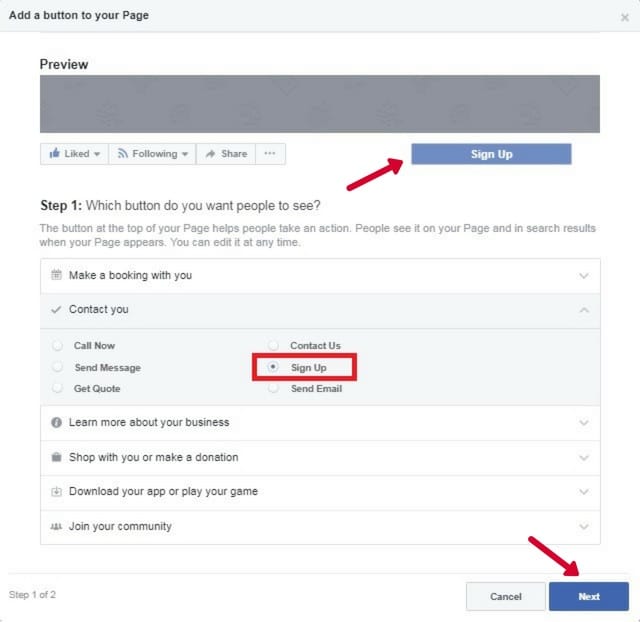
Step 3: Click ‘Website Link’ and then add your lead magnet’s dedicated landing page URL to the field in the pop-up box. Although Facebook will automatically give you stats on CTA clicks under the Insights tab on your Page, consider adding a unique UTM tracking code to your button’s URL so that you can see how effectively your CTA button is driving traffic and conversions. When you’re done, click ‘Save.’
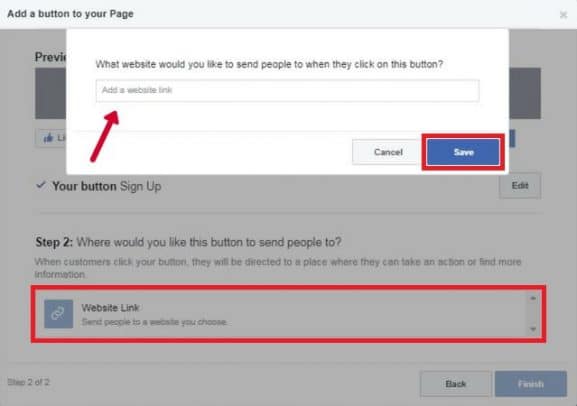
Believe it or not, this simple change can help you up the ante any time you want to create a campaign around a specific objective.
Which brings me to my next tip…
Most businesses have an on-brand, well-designed cover photo to spice up the aesthetics of their Page. After all, it’s prime real estate. However, there’s so much more you can do to transform your visually appealing pic into an ultra-cool lead capture tool.
Option #1: Add call-to-action copy and an arrow that points out your related CTA button
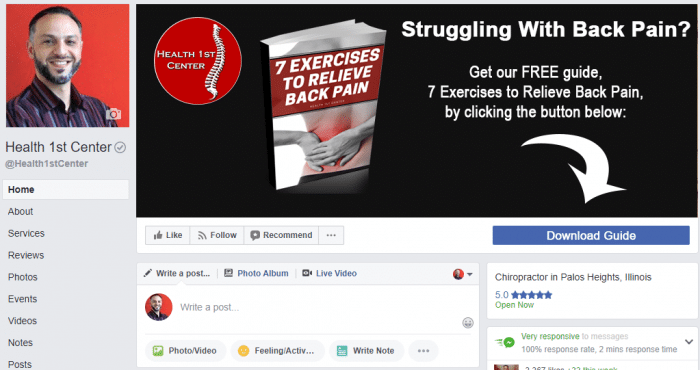
No matter what kind of local business you own, anyone can take a leaf out of Dr.Shalabi’s book by promoting their free offer through a well-optimized cover photo. A clear call to action and unmissable white arrow directed at the Download Guide button leave visitors in no doubt about what to do next.
To create your Page’s cover image, use an online design tool like Canva. Besides including your lead magnet’s cover image, add concise text that highlights the value of your lead magnet, as well as other eye-catching elements that will immediately capture attention. Make sure your copy is specific so that visitors to your Page know what your free offer is and that it’s for them (your target audience).
Facebook requires cover photos to be 820 pixels wide by 312 pixels tall. This will resize to 640 pixels wide by 360 pixels tall on mobile, so be sure to check it out on multiple devices after you’ve uploaded it. Ideally, you should try to make the image resolution slightly higher so that it’s crisp no matter what device you view it on. This will also future-proof it for any new devices with better image resolution.
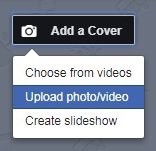
To add a new cover photo, navigate to the top left corner of your Facebook Page where the image is positioned and then click ‘Add a Cover’ (or ‘Change Cover’ if you already have one). Select ‘Upload photo/video’ and then choose the relevant image from your computer files. You might need to reposition your image before hitting the ‘Save’ button.
Note that you can also create a slideshow. If this makes sense for your lead magnet offer, upload several relevant images and then click ‘Create slideshow.’ Your chosen images will then automatically rotate, giving visitors a bigger picture of your offer. This is also a great opening for a little storytelling.
Option #2: Add a relevant and compelling description to your cover photo
Images are clickable and they show up in the Newsfeed when you update them, so why not add persuasive copy and a landing page link to a description that further boosts your efforts?
Take a look at how Melanie Duncan nails this by adding a special ‘Click here’ call to action to her cover image and the description viewers see once they click:

Andrew and Pete have also mastered this, providing additional info about their free webinar:
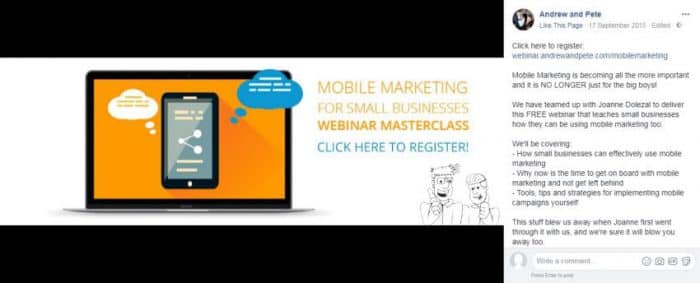
If the free guide you’ve created for your local business is evergreen, adding a description and link to your cover image can be a great way to keep your promotion alive long after you’ve moved onto other campaigns. Anyone who comes across your cover image photo album on Facebook will still have an opportunity to grab your freebie.
To add a description, simply click your cover image once you’ve uploaded it to Facebook and then click ‘Add a description.’ Insert your copy along with a link to your dedicated landing page and then click ‘Finished Editing.’
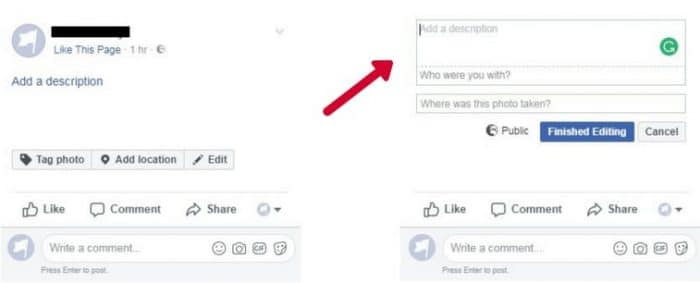
You can then tag your cover image and add the location of your business.
Option #3: Add a super slick video cover
Over the last few years, video has become the powerhouse of content types.
Remember that little chart I showed you at the beginning of this post? Notice how Youtube forms part of the orange line that surpasses all others?
Well, in early 2017, Youtube reported people around the world were watching 1 billion hours of video on their site every day.
During a community town hall in 2014, Mark Zuckerberg was quoted as saying, “In five years, most of Facebook will be video.”
And by the end of 2015, Facebook video views were up to 8 billion per day.
These astronomical figures have only continued to grow, which means that marketers who aren’t taking advantage of video are way behind the curve. They’re also missing out on those greenbacks they’re fighting so hard to win.
On a business’s Facebook Page, the cover image offers one of the earliest and easiest opportunities to use video while generating leads. You only need to look at Mari Smith’s Facebook Page to know it works.
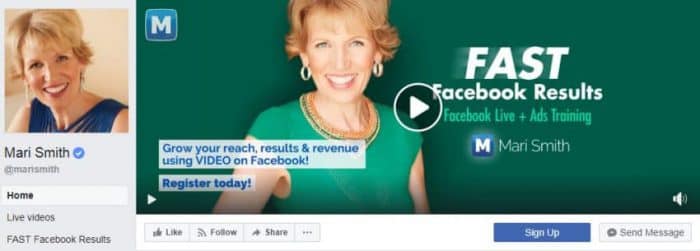
When you click her video cover, you’ll discover that it has generated more than 23,000 views in just 3 months.
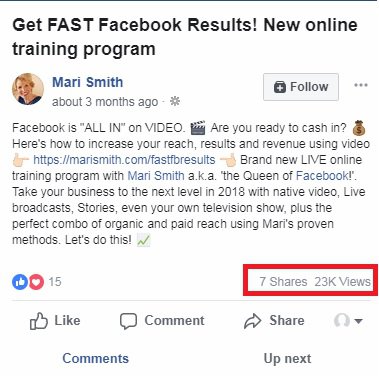
While Mari’s video is educational, teaching viewers the importance of video through the latest statistics, Andrew and Pete strike gold once again with a fun, funny, and on-brand cover video that involves really bad singing, fireworks testing in the office, and whipped cream being playfully smashed into a surprised colleague’s face. During the short but entertaining snippet (where no one was hurt), this successful marketing duo share what you can expect to learn from them if you invite them into your inbox.

To upload your own video, simply follow the instructions described in option #1. Instead of selecting an image file, choose your video file and save it. Facebook’s video cover dimensions are 830 wide by 312 tall, with a minimum duration of 20 seconds and a maximum duration of 90 seconds.
Whatever kind of cover image you decide to create during a lead generation campaign, make sure that it’s suited to your brand and focused on the value you provide with your offer. You might even want to test them out to see which gains the most traction.
Another clever way to wring all you can out of your CTA button and cover image is to create a call-to-action promotion. This highly underutilized list building tactic amplifies the power of the CTA button by expanding the reach of your free offer and encouraging more people to take action. This is a paid Facebook Ad feature, but you can easily get started for just a few dollars a day.
To create a call-to-action promotion, follow these steps:
Step 1: Click ‘Promote’ beneath the list of tabs on the left of your Page.
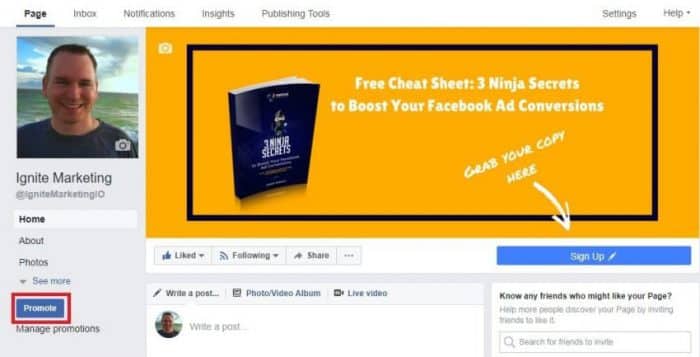
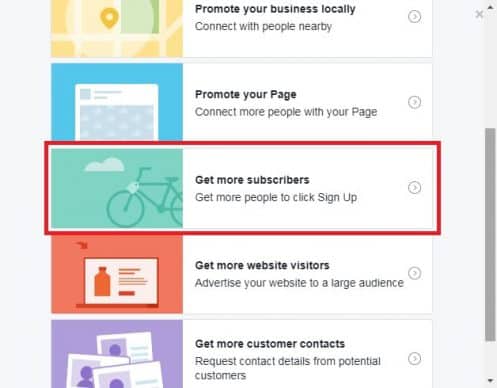
Step 2: Click ‘Show more’ to expand the list and then select ‘Get more subscribers’ from the pop-up menu. You’ll notice that this option changes based on the CTA button you’ve chosen.
Step 3: Set up your ad creative by typing in your headline and promotional copy. Facebook will automatically pull in the image or video from your Page’s header. Since the ad image ratio is slightly different to your cover image, you might need to edit this image or upload an altered one.
As you scroll down, you’ll need to establish your target audience, budget, campaign duration, and whether or not you want to run this promotion on Instagram. Once you’ve filled in the necessary details, hit ‘Promote.’
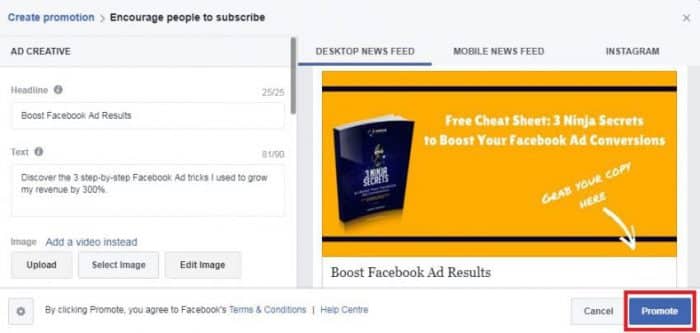
Your new CTA button promo should look like this:
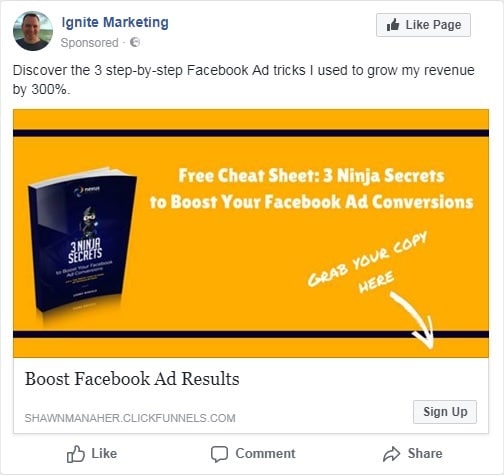
Keep in mind that you want to have your Facebook pixel and UTM tracking codes set up to measure the performance of this ad. If you have your Facebook pixels installed and you used a UTM link when setting up your CTA button earlier, you’re already set. I discussed setting up custom conversions in my guide on creating paid Facebook offers for local businesses. Grab a free copy by signing up below.
Posting the landing page link directly to your Facebook Page as an update can be a fantastic way to spread the word about your free offer and boost conversions. While you should be careful to create a balance between engaging, non-promotional content and promotional content, you should ensure that lead generation posts form part of your social media strategy and that you schedule them on a regular basis.
The great thing about Facebook posts is that you have a variety of options. From general status, video, and photo posts to photo carousels and slideshows, you can make each lead generation post look different from the last.

In the following post, HubSpot used a popular technique that got Facebook to pull in an image from their lead magnet landing page along with crucial metadata describing their offer.
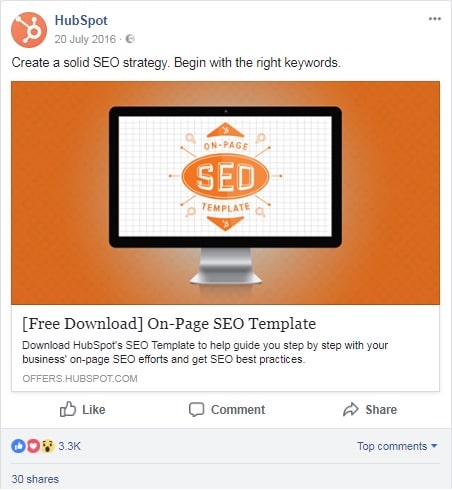
To do this, they simply copied and pasted a link into their Page’s status box, waited for Facebook to grab the featured image on their landing page along with the info, and then deleted the link. The image and data below it are clickable, directing potential leads to the landing page.
Using a different tactic to promote a free webinar, HubSpot opted for a video lead generation post that included call-to-action copy and a link to their lead capture page.
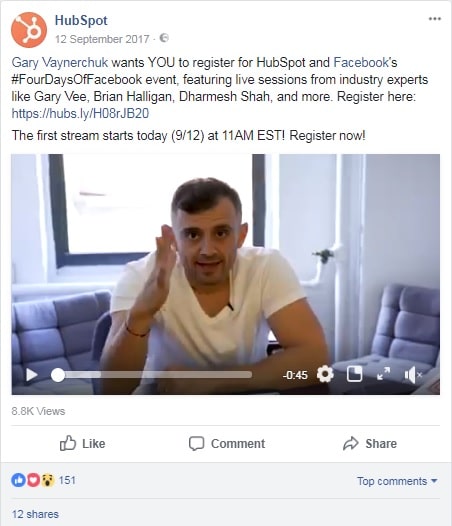
Notice how different the two posts look yet both have the same objective (i.e. to generate leads)?
How you want your post to look is entirely up to you. However, as with anything you do in marketing, it’s a good idea to test different post types and styles to see which prompts the best response rate.
Tips for Creating the Best Posts
Link Posts:
Photo Posts:
Video Posts:
With organic reach declining, it’s important to make your lead generation posts enticing. Posts with visual elements tend to drum up far more engagement—and therefore reach—than those without, so be sure to adopt a style that works for your brand.
When you understand the psychology that motivates behavior, you’ll understand why we can’t leave that little box with the tantalizing words in it alone. We must press it. We expect it. It intrigues our sense of curiosity. Perhaps most importantly, it rewards us for good behavior.
For local business owners, it can help line the cash register with Benjamins.
But can you wield that power in an organic lead generation post on Facebook?
Believe it or not, you can.
Creating a Page post with a CTA button in Ads Manager
Step 1: From within your Ads Manager menu, select ‘Page posts.’
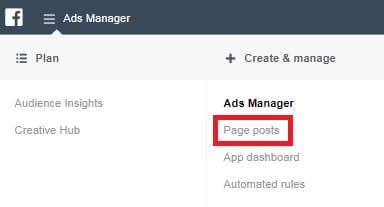
Step 2: Click ‘Create Post.’

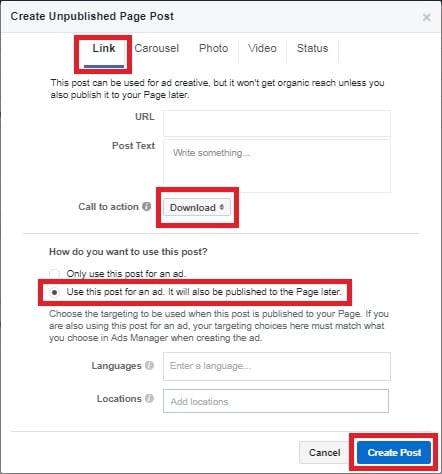
Step 3: Within the ‘Link’ tab, add your landing page’s URL, insert promotional copy, and change the CTA button to ‘Download’ or ‘Sign Up.’ Facebook will pull the featured image from your landing page into the post. The only downside to this is that you can’t edit the image. The only way to make this work so that your post looks polished is to make sure the featured image on your landing page fits within Facebook’s specs for posts. Alternatively, you can also create a carousel post with a CTA button in Ads Manager. With a carousel, you can pick which images are displayed.
Before you hit ‘Create Post,’ be sure to change the way you want to use the post. You should also add both your language and location preferences.
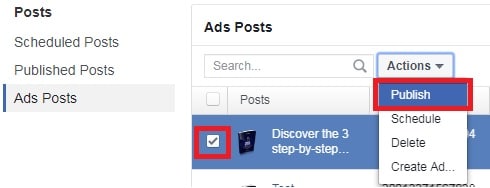
Step 4: Once the details load into the Page post list, tick the box to select your new post and then click ‘Publish’ from the ‘Actions’ menu.
Your post will then look something like this:
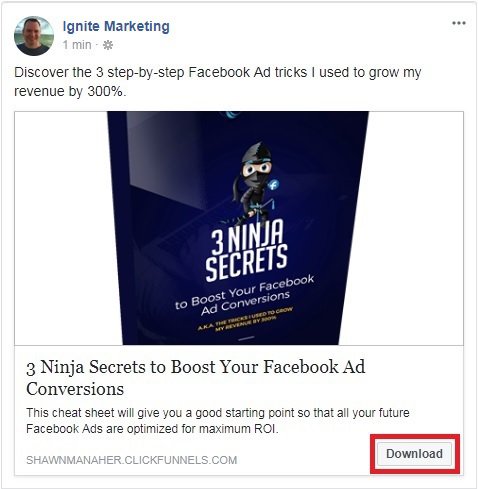
Check out that shiny new ‘Download’ button!
And just think: you didn’t pay a penny for it. Score!
The upside to using Ads Manager for link posts is that you can schedule your lead generation promotions in advance. When running multiple campaigns across multiple platforms, this feature can be a huge timesaver.
Since lead generation posts are so valuable, you’ve got to make sure they earn their keep. If you let them slide down your Timeline, they’ll get lost in the noise and all your efforts will be for naught. You can keep them visible for longer by pinning them to the top of your Page’s feed.
To pin a post, simply locate the lead generation post you want to pin, click the three dots in the top right corner, and then select ‘Pin to top of page.’
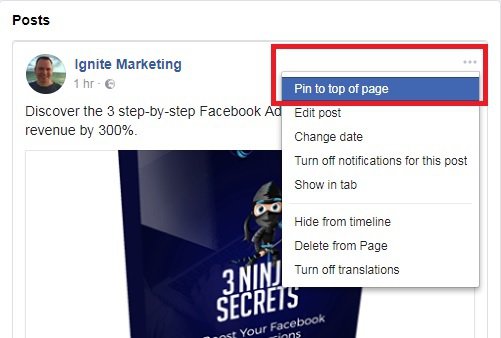
Your post will then be pinned to the top of your timeline, which you’ll be able to identify by a small blue pin icon.![]() If you’re testing various lead generation posts, analyze their performance and pin the most effective one.
If you’re testing various lead generation posts, analyze their performance and pin the most effective one.
Besides the fact that 52% of marketing professionals say video produces the best ROI out of all content types, did you know that people spend 3x longer watching live video compared to video that’s not live? In fact, Facebook gives greater prominence to live videos in News Feeds because if it.
Video is already an amazing teaching tool that can help boost your authority, so going Live and sharing your knowledge in a real-time setting only amplifies your credibility. It’s also a great opportunity to supercharge your list growth.
Prior to launching a live feed, make sure you have a topic related to your lead magnet and a compelling description. During your session, you’ll want to be prepared to teach, provide value, and answer any questions viewers might have. Before starting, you’ll also want to write posts promoting when you’ll be on air so that you’ll have a live audience.
To go live, simply click the ‘Live video’ tab on your Facebook Page. You can stream from your iPad, iPhone, Android device, or desktop. If you’re streaming from your desktop, you’ll need to use Chrome.

When you’re setting up your live feed (i.e. before hitting the ‘Go Live’ button), you’ll be able to choose your privacy settings, add your description, choose your location, tag people, set up your camera view, add lenses and filters, and more. Once you’re live, you can then start to interact with your audience.
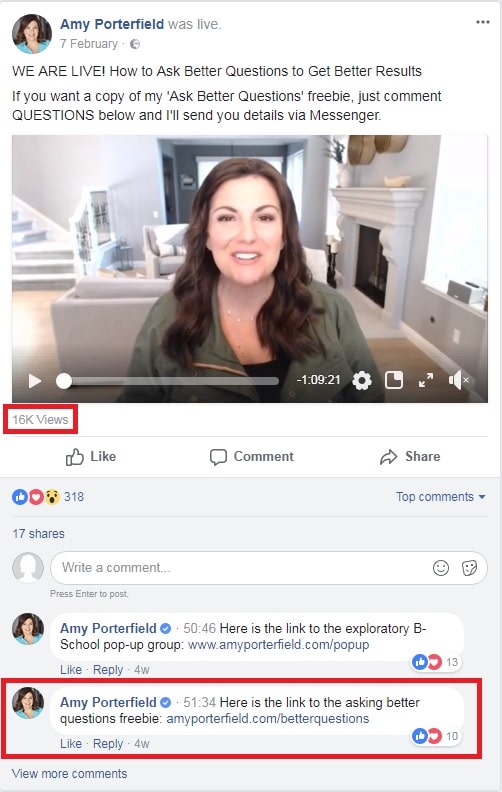
Amy Porterfield is a pro at using Facebook Live for lead generation. In the following post, pay attention to how her Facebook live video generated more than 16,000 views. That’s a lot of traffic she’s potentially driving towards her freebie. Anyone watching her will hear her calls to action and check out the comment section for her links.
In my next post, I’ll be covering all you need to know about creating an effective Facebook Live campaign with all the bells and whistles, so stay tuned.
Okay, so you might only want to choose placement in one of these areas, but they’re both powerful tools for showing your followers how awesome you and your business are. Unlike many other lead generation tactics, this method is unobtrusive and offers a sweet little piece of value to whoever might visit the ‘About’ tab on your Page.
Step 1: Click the ‘About’ tab on the left side of your Page.

Step 2: Find the Story section on the right side of the page and click ‘+ Tell people about your business.’
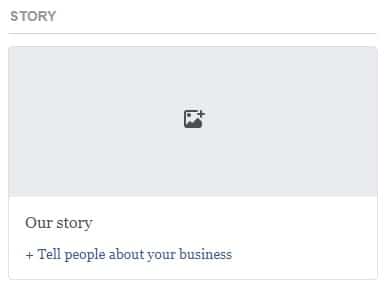
Step 3: Add an interesting line or two about your business before adding your CTA. The reason you want to keep your opening short and then hit readers with a CTA is because when you publish your story only a short portion will be viewable. You want your lead magnet link to be seen without anyone having to hit the ‘See more’ link.
When adding your story, you’ll also have the opportunity to add an image. Be sure to optimize the image with a relevant CTA and visual. Hit the ‘Publish’ button to save and post your business’s story.
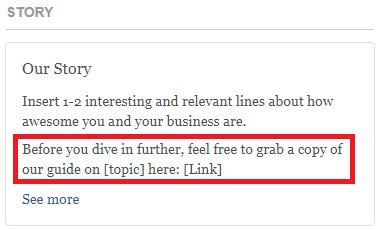
Take note of how the CTA remains above the ‘See more’ link.
Step 1: On the left side of the page under the More Info section, you’ll see a list of things you can change to optimize your page, including an ‘About’ section. Hover over the section until the ‘Edit’ button appears and then click it.

Step 2: Add an engaging and relevant bio along with your landing page link and CTA. Click ‘Save’ and you’re done.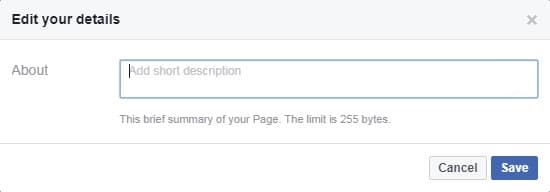
You’ll find that some of the Page tabs Facebook gives you are less relevant than others. Unfortunately, one tab that the social media giant doesn’t offer is an email sign up tab. The good news is that there are plenty of apps you can use to add custom tabs to your Page.
Take a look at how Moz uses a custom tab for their lead magnet:
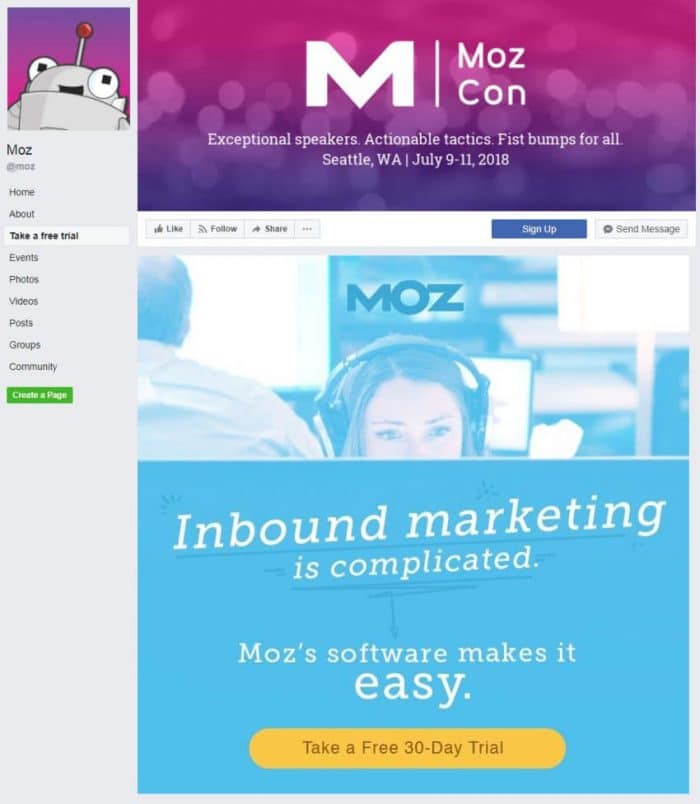
Woobox, ShortStack, Pagemodo, TabSite, and Static HTML are just a few of the apps you should check out. Since each one is different, be sure to compare pricing (some are free) and features. You’ll also need to assess the level of difficulty when it comes to installing your custom tab.
Ultimately, tabs are a great way to enhance your Page while ensuring you offer meaningful content. When done right, they can also improve user experience.
There’s nothing quite like a well-designed, well-targeted, and well-managed Facebook Ad to fuel the lead generation machine. But it’s not—and never will be—just about the ad. Without a well-oiled sales funnel that nurtures leads through to the ultimate conversion, the ad means nothing.
Working with local business owners, it’s become such an important topic to me that I wrote a mega step-by-step guide to creating paid Facebook offers that will rapidly grow a local business. The guide covers the optimization of everything from the ad and its setup to the last touch point in the follow-up sequence. It’s yours for free. Simply click the image below to snatch your copy.
Now while the guide deals specifically with website traffic and conversion ads, I want to bring your attention to one other ad type that offers a low-barrier, minimal-commitment way for potential customers to take advantage of your lead magnet offer without leaving Facebook.
It’s called a Facebook Lead Ad.
These ads are highly effective for running lead generation campaigns, allowing you to collect leads seamlessly with a few quick clicks or taps. When people open your ad, a signup form pre-populated with the information they gave to Facebook appears.
Unfortunately, Facebook doesn’t automatically push leads to your email service provider unless you connect to your CRM. You can learn more about whether yours is supported through their help center page about CRMs. You can also learn how to use the Publishing Tools tab on your Facebook Page to find and connect to your CRM.
Before you create your ad, you’ll need an image or video for your ad, persuasive copy, and the URL to your privacy policy. If you don’t have a privacy policy for your website already, you can use a plugin like Auto Terms of Service and Privacy Policy.
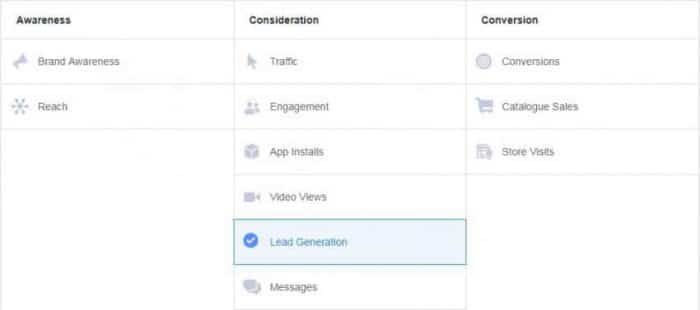
Step 1: Access Ads Manager and choose “Lead Generation” as the campaign objective.
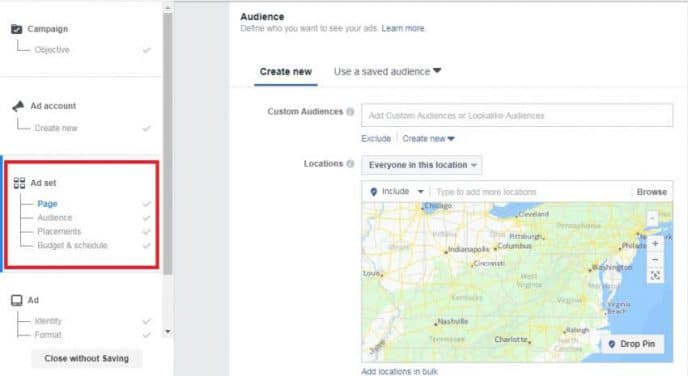
Step 2: Give your campaign a name, accept Facebook’s Lead Ads ToS, and create your Ad Set. Within this section, you’ll want to define your audience, budget, ad placement, and campaign schedule.
Step 3: Select an appropriate format, upload your image or video, add your ad copy, and choose a call to action. At this stage, you’ll also be prompted to create your lead capture form and Thank You page. During the lead form creation, you will be asked to add a link to your privacy policy URL and website. You’ll also be able to additional information about your offer, upload images to the forms, and more.
Step 4: Click ‘Review’ to ensure all your info is right and then click ‘Confirm.’
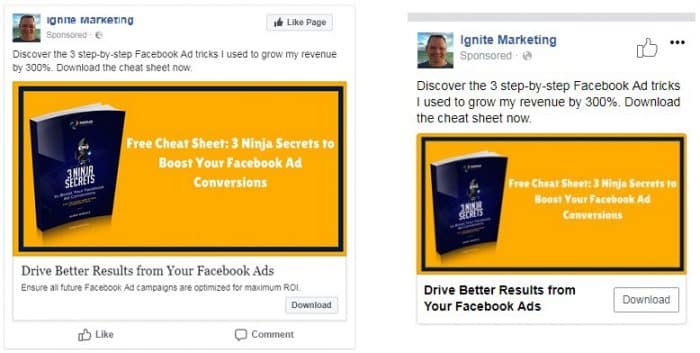
Your desktop and mobile ads should look something like this:
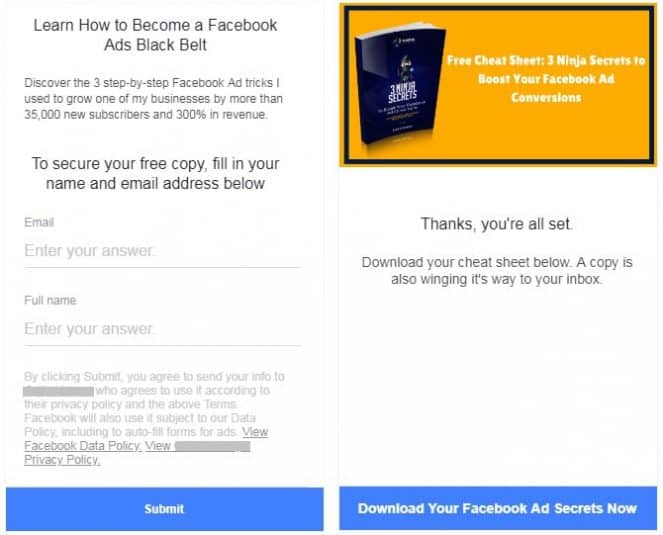
While your form and Thank You page should look something like this:
FAQs
There are three main ways to download leads from your Facebook Business Page. These include:
• Download them through a CSV export from your Page
• Download them from Ads Manager
• Request for your leads through the API or access them from a third-party CRM partner
Before you can download your leads, you first have to create a lead ads campaign. Once you've done that, follow these steps to download your leads:
• At the top of your Facebook Business Page, choose the More drop-down menu and select Publishing tools
• Under Publishing tools, select Lead ads forms to access the Forms library
• Once inside the Forms library, go to the Leads column and select the Download link. At this stage, a new window titled Download leads will appear.
The pop up window will allow you to download your new leads only or all your leads by date range. If you choose the former option, you will be able to download your leads as a CSV file. For the latter option, you will need to use the Lifetime drop-down menu to select the appropriate date range. After selecting the date range, click Update and then Download to complete the process. On clicking Download, you will receive your data as a CSV file. At this point, it is worth noting that if you generate a lead though organic search or submit a lead through an ad preview, the generated CSV file will likely not contain ad group IDs or ad IDs.
Facebook's default leads access permission settings only allow Page admins to download leads from Facebook Business Pages. However, using the Leads Access Manager, Page admins can assign leads access permission to virtually any Page role.
 Wrapping It Up
It’s time to start acing the lead generation game on social media platforms, starting with Facebook. Pages are ripe for promoting lead magnets and capturing the email addresses of potential customers. The key is to focus on value. Whether you’re solving a problem for your target audience, showing them how to do something they never knew was possible, or providing them with a way to save time and money, you should make every piece of copy about them.
So now it’s over to you.
Which Facebook lead generation tactics are you currently using and which one gets you excited to try? Let us know your thoughts in the comment section below. Before you leave, be sure to grab your free copy of my guide: Creating Paid Facebook Offers
